What Goes Into a Proper Drywall Repair (And When to Call a Professional)
Drywall repairs often look simple at first glance, but the difference between a repair that blends in and one that keeps showing comes down to preparation, technique, and patience. Many homeowners attempt drywall repairs themselves, only to discover visible seams, flashing after painting, or cracks that return months later. Understanding what goes into a proper drywall repair can help you decide when a small fix is manageable — and when professional help makes sense. Why Some Drywall Repairs Always Show A drywall repair that stands out is usually the result of shortcuts, not paint color. Common causes include: Repairs that aren’t feathered wide enough Poor taping or rushed mudding Skipping primer before painting Not addressing movement, moisture, or structural issues Paint doesn’t hide drywall problems — it highlights them. What a Proper Drywall Repair Actually Involves A clean drywall repair isn’t just filling a hole. It’s a process. 1️⃣ Fixing the Underlying Issue Before any drywall is patched, the cause of the damage should be addressed. This might include: Securing loose framing Fixing leaks Re-fastening drywall to prevent movement Without this step, cracks often return. 2️⃣ Correct Taping and Mudding Professional drywall repairs use: Proper joint tape Multiple coats of compound Wide feathering to blend transitions This is especially important on ceilings and flat walls where imperfections are easy to see. 3️⃣ Sanding and Surface Prep Each coat must be sanded carefully to keep the surface flat. Rushed sanding often creates uneven spots that show under light. 4️⃣ Priming Before Painting Drywall compound absorbs paint differently than finished drywall. Priming seals the repair so paint applies evenly and doesn’t “flash.” In many cases, painting the entire wall is the only way to fully hide a repair. When DIY Drywall Repair Makes Sense Small repairs can sometimes be handled by homeowners, such as: Tiny nail holes Very minor dents Non-structural cosmetic marks These repairs are low risk and usually don’t involve ceilings or seams. When to Call a Professional for Drywall Repair Professional drywall repair is usually the better choice when: The damage is on a ceiling Water damage is involved The repair is larger than a few inches Cracks keep coming back The repair needs to be invisible once painted In these cases, experience makes a noticeable difference. Drywall Repairs in Older Homes Older homes often present additional challenges, including: Framing movement over time Previous patch attempts Older drywall installation methods Matching existing finishes and preventing future cracking requires careful preparation. Professional Drywall Repair in Your Area If you’re dealing with drywall damage and want a repair that blends in properly, professional help can save time and frustration. For homeowners looking for drywall repair services in Trenton, Comfort Property provides clean, seamless repairs focused on long-term results. We also offer drywall repair services in Quinte West for homeowners in surrounding areas who need reliable, professional repairs. Final Takeaway A proper drywall repair isn’t about speed — it’s about preparation and finish. Knowing what goes into the process helps you avoid repairs that crack, flash, or never quite disappear. When in doubt, getting the repair done properly the first time usually costs less than fixing a poor patch later.
Drywall Repair Near Me — What a Proper Drywall Patch Should Really Look Like
When you search for “drywall repair near me”, you’re likely looking for someone who does more than just cover up holes — you want a patch that blends in seamlessly with your wall or ceiling. Too often, homeowners end up with drywall patches that still show outlines, shadows, or texture differences even after they’ve been painted. If that sounds familiar, it’s not your paint — it’s the work underneath. A proper drywall repair in Belleville, Trenton, or Prince Edward County should be invisible once finished. In this article we’ll walk you through: What a professional drywall repair should look like, Why some patches still stand out, And what to expect from a quality repair by a local expert. In this article we’ll walk you through: What a professional drywall repair should look like, Why some patches still stand out, And what to expect from a quality repair by a local expert. What a Professional Drywall Repair Should Look Like When your drywall repair is done right: The repaired area should sit flat with the rest of the wall or ceiling, There shouldn’t be visible edges or shadows, Lighting from windows or overhead shouldn’t reveal the patch, Paint should appear smooth and consistent across the entire surface. In short, you shouldn’t be able to tell where the repair was done — even if you look closely. Why Some Patches Still Show After Painting Here are the most common reasons drywall patches remain visible: ➤ Patch Too Small If the repair area isn’t feathered out correctly, light hitting the wall will reveal edges where the new compound meets the old drywall. ➤ Primer Was Skipped Primer ensures that drywall compound and wallboard absorb paint the same way. Without it, the patch will reflect light differently and stand out. ➤ Improper Finishing Walls have subtle texture — even “smooth” ones. If this texture isn’t replicated correctly around the patch area, the repair can look obvious. ➤ Ceiling Repairs Require Extra Attention Because ceilings are large and flat, imperfections are far more noticeable, especially with natural light from windows. A meticulous drywall repair — especially for ceilings — needs: Wider feathering, Multiple sanding stages, Careful lighting checks before painting. Searching for “Drywall Repair Near Me”? Here’s What to Expect When you choose a local expert for your drywall repair in Belleville, Trenton or PEC, you should expect: Clear communication about the work needed, A repair that blends into your wall, not stands out, Proper priming and painting included, Honest pricing and turnaround times. At Comfort Property, our goal is simple:You shouldn’t be able to see where we were. Whether it’s a small spot repair, ceiling crack, or damage from an accident or renovation, we make sure the finished result looks like the damage never happened. Why Local Matters for Drywall Repair Homeowners don’t just search drywall repair online — they search drywall repair near me when they want someone who: Knows local building practices and materials, Can show up reliably for the job, Understands area homes and finishes, Offers prompt service without long waits. That’s exactly what we offer across Belleville, Trenton, Brighton, and Prince Edward County. Ready to Fix Your Wall So It Disappears? If drywall damage is standing out — even after a patch — you deserve a repair that actually blends in. Contact Comfort Property for a drywall repair that looks smooth, complete, and professional — no visible patch lines, no shadows, no guesswork.
Belleville Kitchen Floor Upgrade: Vinyl Plank Flooring in a Mobile Home
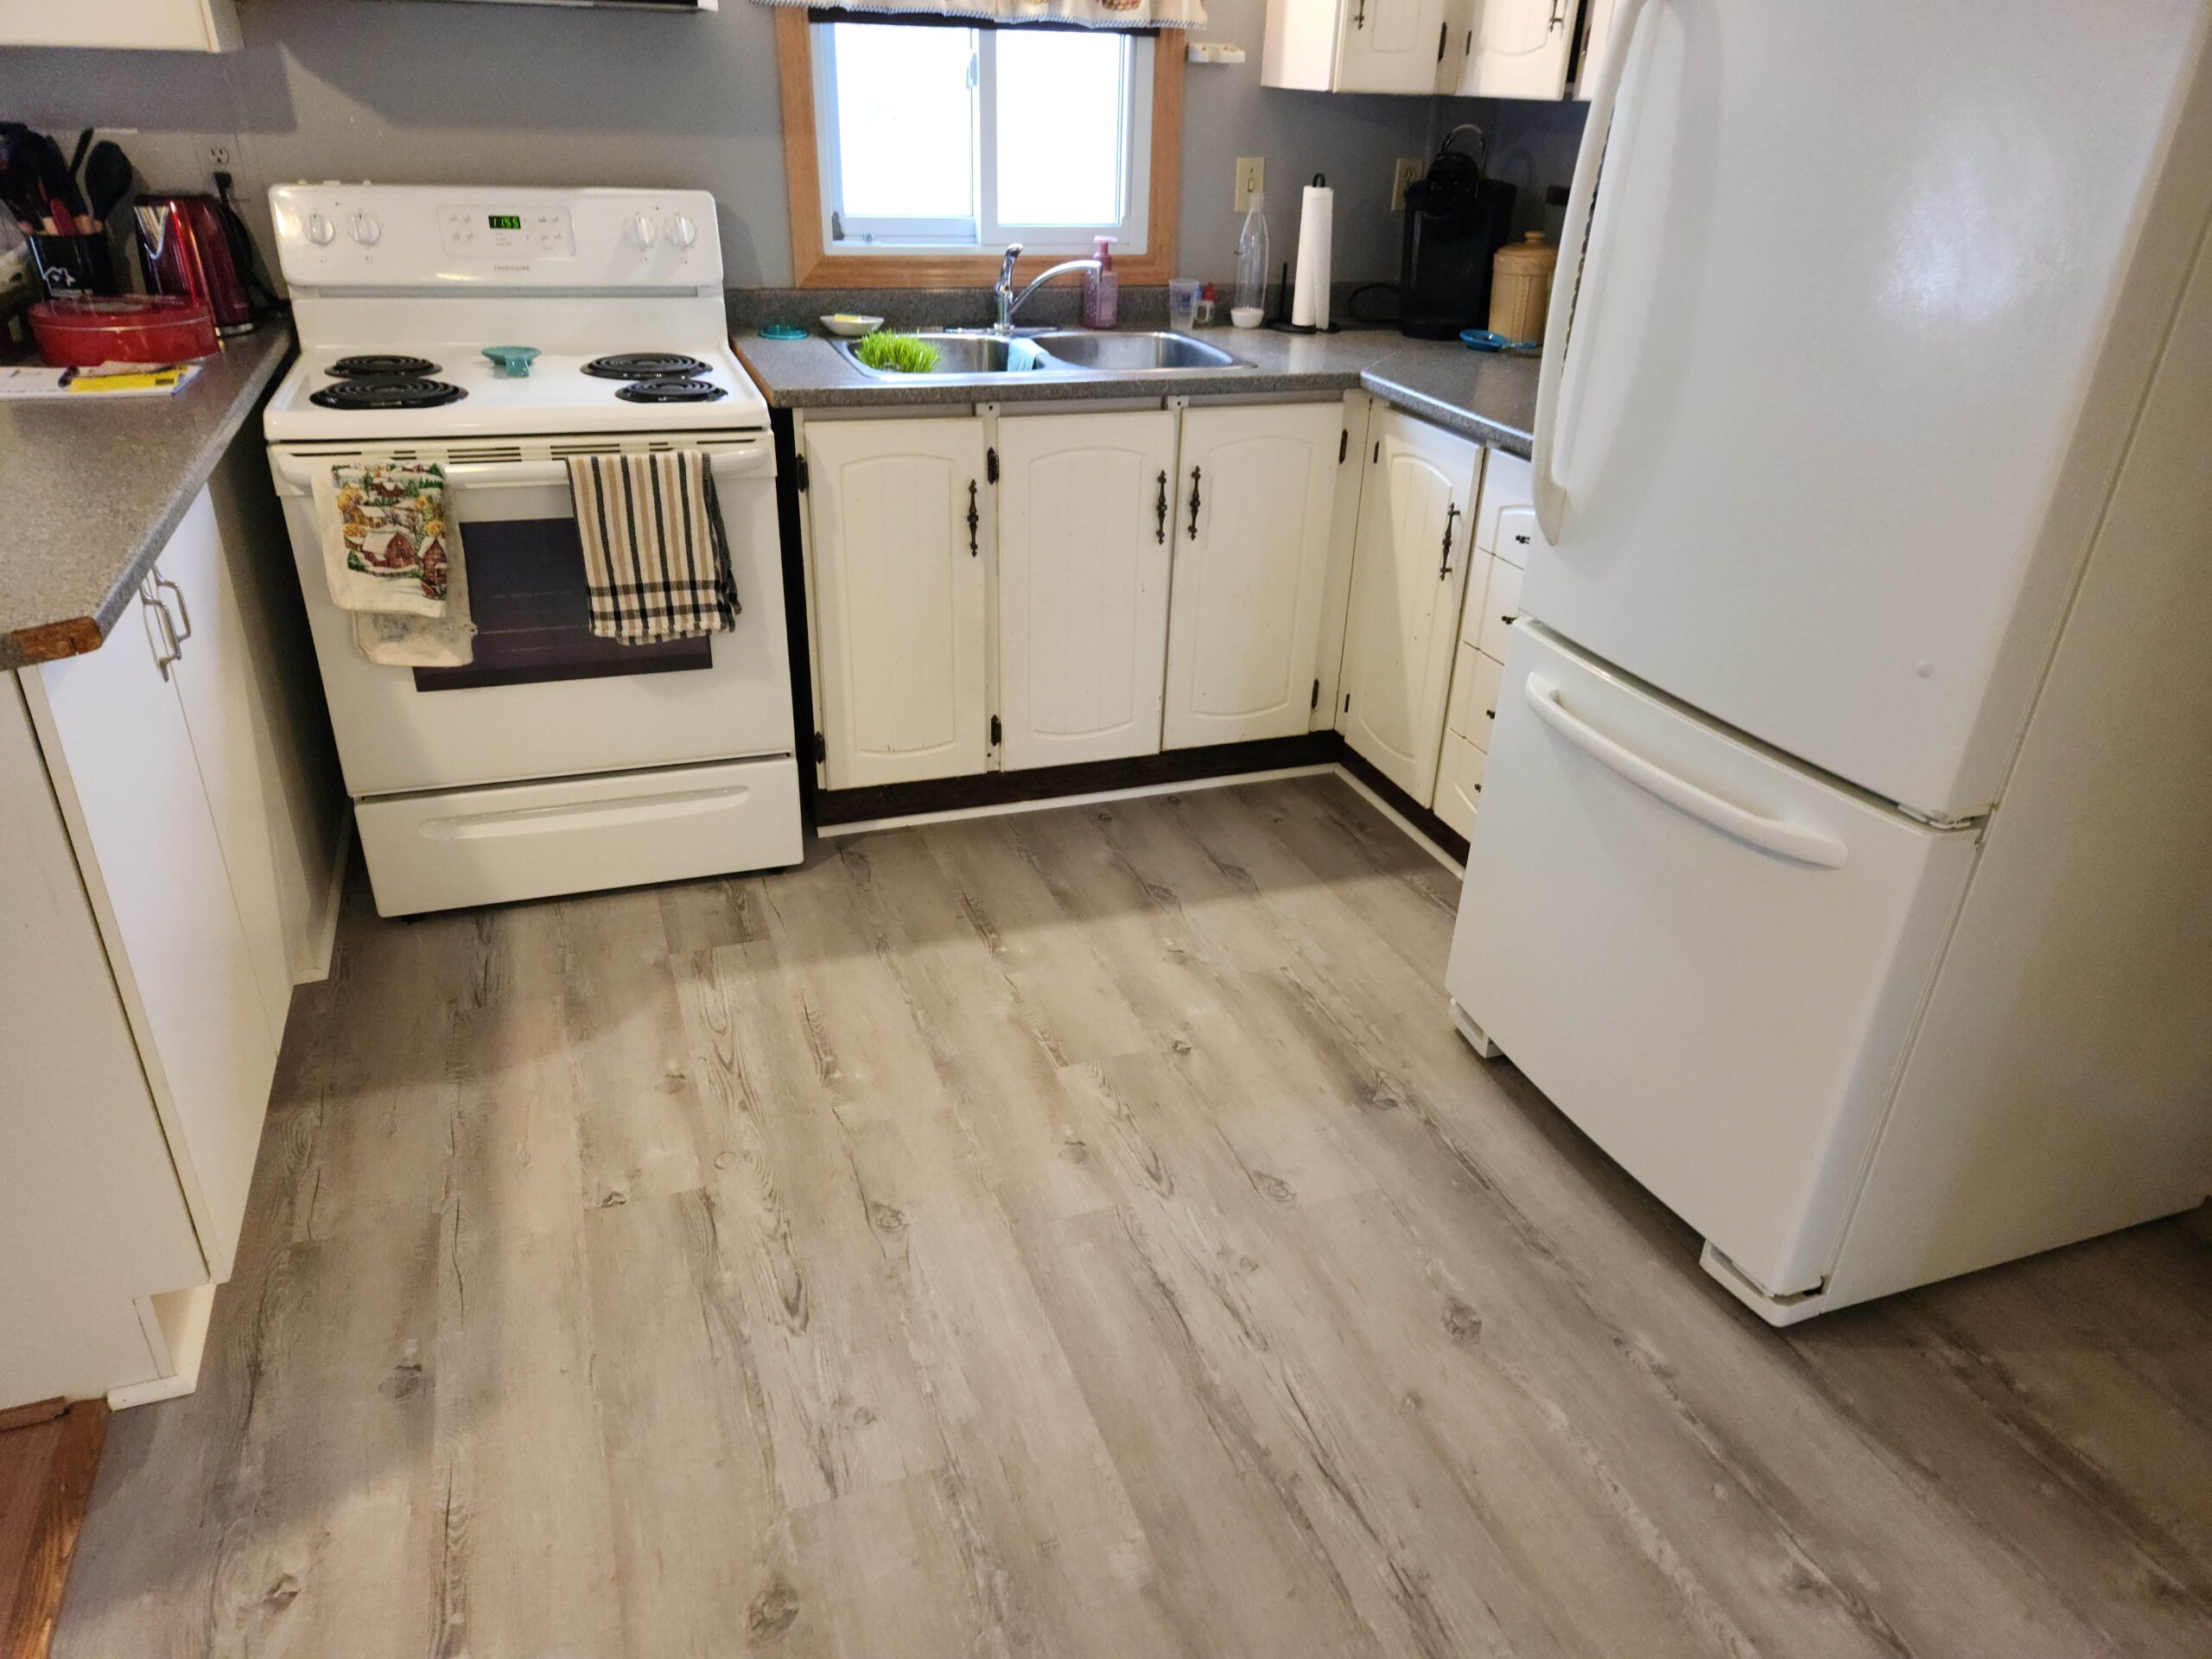
Older mobile homes often have kitchens that are functional but dated. Flooring is usually one of the first things to show its age — especially in kitchens, where moisture and daily wear take a toll. For this Belleville kitchen floor project, we upgraded an older mobile home from the 1970s–1980s by installing vinyl plank flooring over the existing linoleum. The result is a clean, durable, and waterproof kitchen floor that fits the space and performs well for everyday use. The Challenge: Old Flooring in a Mobile Home Kitchen Mobile homes from this era often have: Dated linoleum flooring Limited subfloor thickness Slight movement compared to site-built homes Uneven surfaces from years of use Because of this, flooring upgrades in mobile homes need to be done carefully. Removing old linoleum isn’t always necessary — and in some cases, installing over it is the better option. Why Vinyl Plank Flooring Was the Right Choice Vinyl plank flooring is a practical solution for older kitchens because it: Is waterproof, making it ideal for kitchens Handles minor movement better than rigid flooring Provides a modern look without heavy structural changes Installs cleanly over existing linoleum when conditions allow For this kitchen, vinyl plank offered the best balance of durability, appearance, and long-term performance. Step 1: Preparing the Existing Linoleum Floor Before installing the new flooring, the existing linoleum was: Checked for loose areas or damage Cleaned and prepped to ensure proper adhesion and flatness Inspected for seams or transitions that could telegraph through the new floor Proper preparation is critical when installing vinyl plank over older flooring. Step 2: Installing the Vinyl Plank Flooring Once the surface was ready, the vinyl plank flooring was installed with attention to: Proper layout and plank alignment Correct spacing at walls and edges Clean cuts around cabinets and appliances Even in a dated kitchen, a new floor can dramatically improve the look and feel of the space. The Result: A Waterproof, Updated Kitchen Floor In the after photo, the kitchen floor looks cleaner, brighter, and more modern. While the kitchen itself remains original, the new vinyl plank flooring gives the space a refreshed feel and provides a waterproof surface that’s well-suited for kitchen use. This type of upgrade is a practical way to improve older mobile homes without major renovation work. Kitchen Flooring for Mobile Homes in Belleville Flooring in mobile homes requires an understanding of how these homes are built and how materials perform over time. Choosing the right flooring — and installing it correctly — makes all the difference. At Comfort Property, we help homeowners in Belleville upgrade kitchens with durable, practical flooring solutions that make sense for the home. If you’re considering a vinyl plank kitchen floor in a mobile home, or looking for kitchen floor upgrades in Belleville, we’re happy to help.
5 Signs That Your Trenton Asphalt Shingles Needs Attention
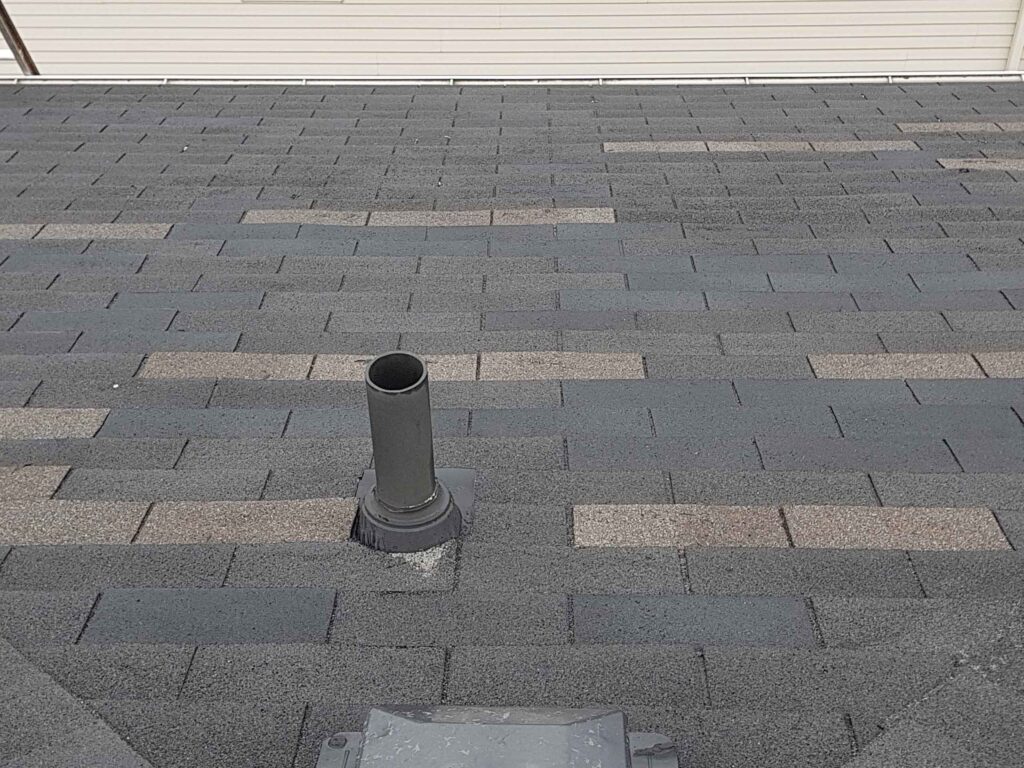
Asphalt shingle roofs rarely fail all at once. Most of the time, they show warning signs long before water starts coming inside — but those signs are easy to miss if you don’t know what to look for. In Trenton, many homes and cottages have aging asphalt shingle roofs that are reaching the later years of their lifespan. Spotting problems early can help prevent interior damage and give homeowners time to plan next steps. Below are five common signs your asphalt shingle roof may need attention. 1️⃣ Sections of New Shingles Mixed With Older Ones One of the clearest warning signs is when part of the roof has been repaired while the rest remains original. In the photo shown, a section of the roof has new shingles installed next to much older shingles. This usually means: Leaks were repaired in one area The roof is aging unevenly Other sections may soon start failing While spot repairs can help temporarily, mixed shingle ages often indicate the roof is nearing the end of its service life. 2️⃣ Curling or Lifting Asphalt Shingles As asphalt shingles age, they can begin to curl or lift at the edges. This allows: Wind to get underneath Rain to penetrate the roof system Faster deterioration of surrounding shingles Curling shingles are a strong indicator that the roofing material is breaking down. 3️⃣ Granule Loss on Shingles Asphalt shingles are coated with protective granules that shield them from sun and weather. If you notice: Smooth or bare spots on shingles Granules collecting in gutters Shingles appearing darker or worn the roof may be losing its protective layer, increasing the risk of leaks. 4️⃣ Repeated Minor Leaks or Water Stains Water stains on ceilings or walls — even small ones — shouldn’t be ignored. Repeated leaks often suggest: Multiple weak points on the roof Aging materials rather than a single failure A roof that’s no longer shedding water effectively Over time, these leaks can lead to interior damage. 5️⃣ The Roof Is Simply Old Many asphalt shingle roofs installed 20–30 years ago are now past their expected lifespan. Even if leaks are occasional, age alone can mean: Reduced protection Increased maintenance needs Higher risk during heavy rain or wind At this stage, planning becomes just as important as repairing. What to Do If Your Roof Shows These Signs Not every situation requires immediate roof replacement — especially if renovations are being planned or timing isn’t right. In some situations, homeowners choose temporary roof protection to prevent further damage while planning long-term repairs. Protecting the Interior While Roof Issues Are Addressed Roof problems don’t just affect the exterior. Ongoing leaks can eventually lead to interior issues that require drywall repair near me once the roof is stabilized. Ceiling damage often appears first around fixtures or penetrations, leading to repairs similar to this ceiling drywall repair in Belleville. Roof Assessments and Temporary Protection in Trenton At Comfort Property, we help homeowners in Trenton assess aging asphalt shingle roofs and choose practical solutions — whether that means monitoring, temporary protection, or planning ahead. Addressing issues early can prevent emergencies and reduce the risk of costly interior repairs.
Trenton Cottage Roof Tarp Installation: Full Roof Protection While Planning Renovations
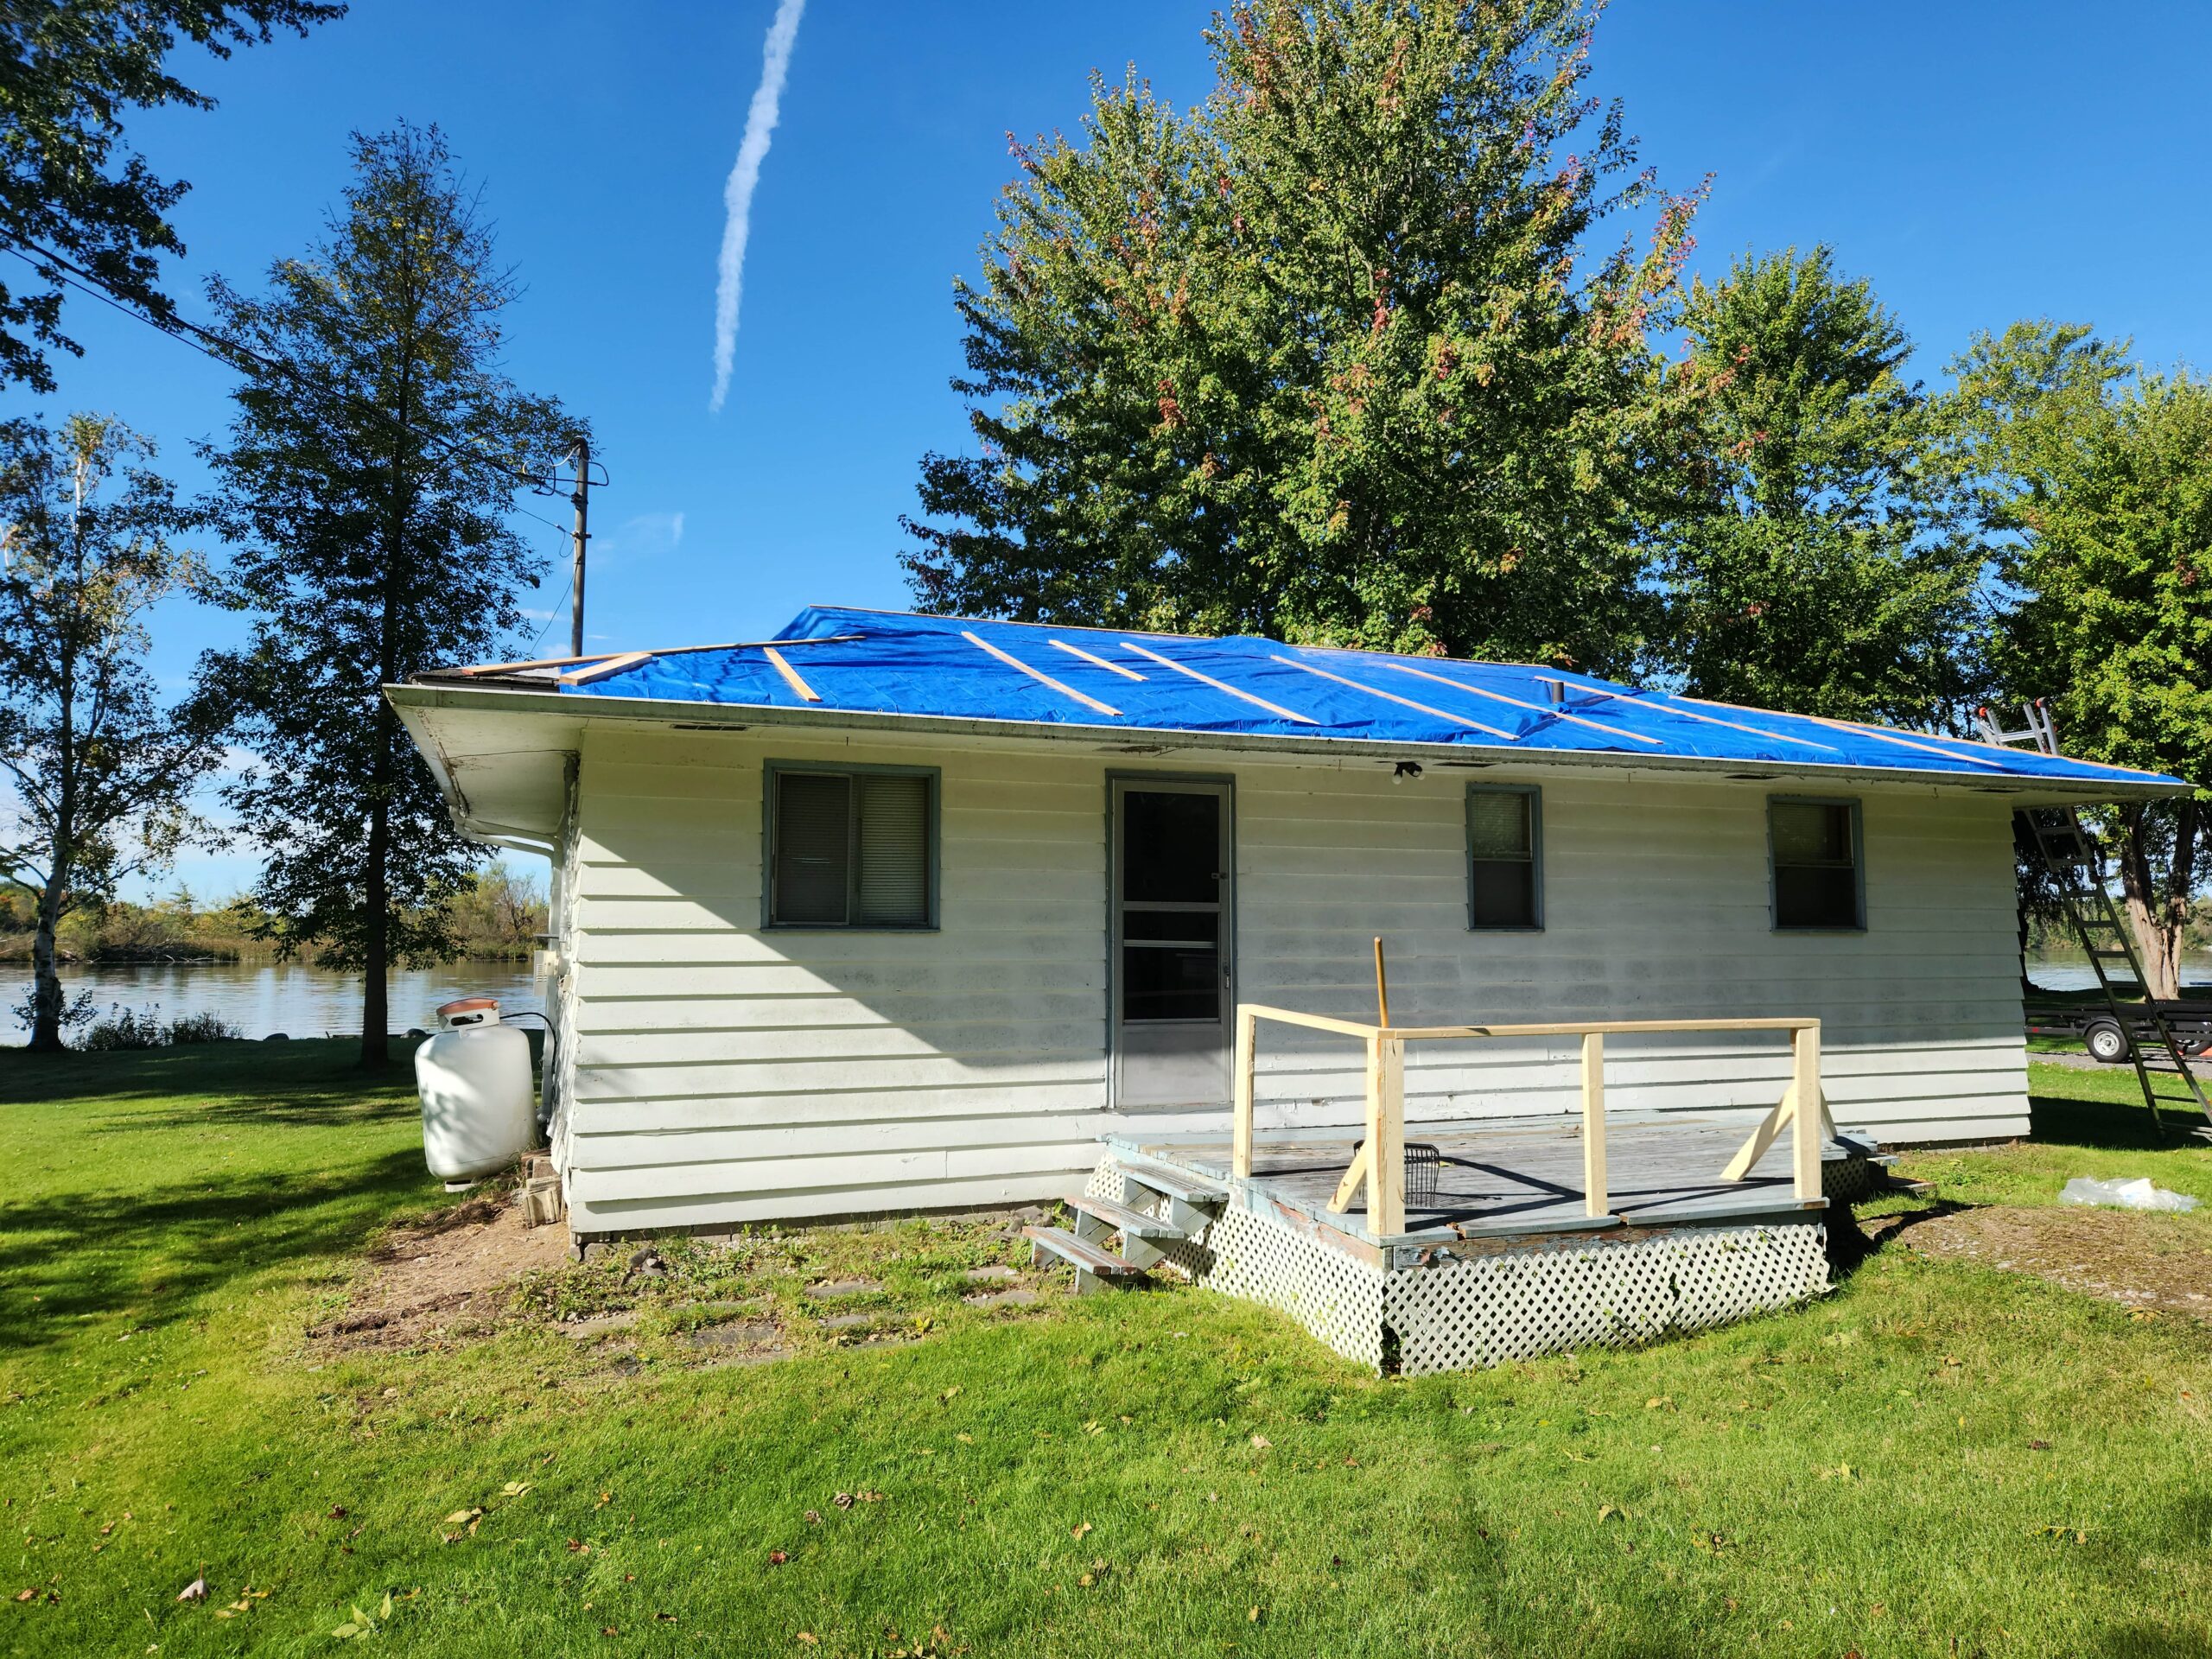
Older cottage roofs don’t always fail in obvious ways. Sometimes there’s no single missing shingle or visible hole — just an aging roof that has reached the end of its life and has started letting water in. For this Trenton cottage roof tarp installation, the homeowner was dealing with active leaks but wasn’t ready to replace the roof yet. With upcoming renovations still being planned, the priority was to protect the entire roof and prevent further damage in the meantime. The Situation: An Aging Cottage Roof With Active Leaks When we were called out, there was no clear, isolated source of the leak. The roof itself was simply old and due for replacement. This is a common situation with cottages and seasonal properties: Roofing materials degrade over time Leaks appear intermittently Water entry points aren’t always visible Full replacement may not align with renovation timing Rather than rushing into a roof replacement, the homeowner needed a temporary but reliable solution. Why We Tarped the Entire Roof In cases like this, spot repairs don’t make sense. For this cottage, the best option was to: Tarp the entire roof surface Create a continuous waterproof barrier Protect the structure while renovation plans were finalized A full roof tarp can prevent further water damage and buy valuable time — as long as it’s installed correctly. Securing the Roof Tarp Against Wind One of the biggest risks with roof tarps is wind. For this Trenton cottage, the tarp installation included: Full roof coverage Proper overlapping to shed water Strapping installed over the tarp to hold it firmly in place Secure fastening to prevent movement or lift Strapping the tarp is critical, especially on cottages that may be exposed to open wind or changing weather conditions. The Result: Reliable Temporary Protection With the tarp and strapping installed, the roof was fully protected from further water intrusion. While a tarp is not a permanent roofing solution, this approach allowed the homeowner to: Stop ongoing leaks Protect the interior of the cottage Plan renovations without added pressure The after photos show the roof fully covered and secured — a practical solution done properly. Roof Tarp Services for Cottages in Trenton Cottage properties often require flexible, short-term solutions while long-term plans are being made. A professionally installed roof tarp can protect your property and prevent costly interior damage. Roof leaks can often lead to interior damage that requires drywall repair near me once the issue is under control. At Comfort Property, we provide roof tarp installations in Trenton, including full-roof tarping for cottages and older homes. If you’re dealing with leaks but aren’t ready for a roof replacement, we’re happy to help you protect your property in the meantime
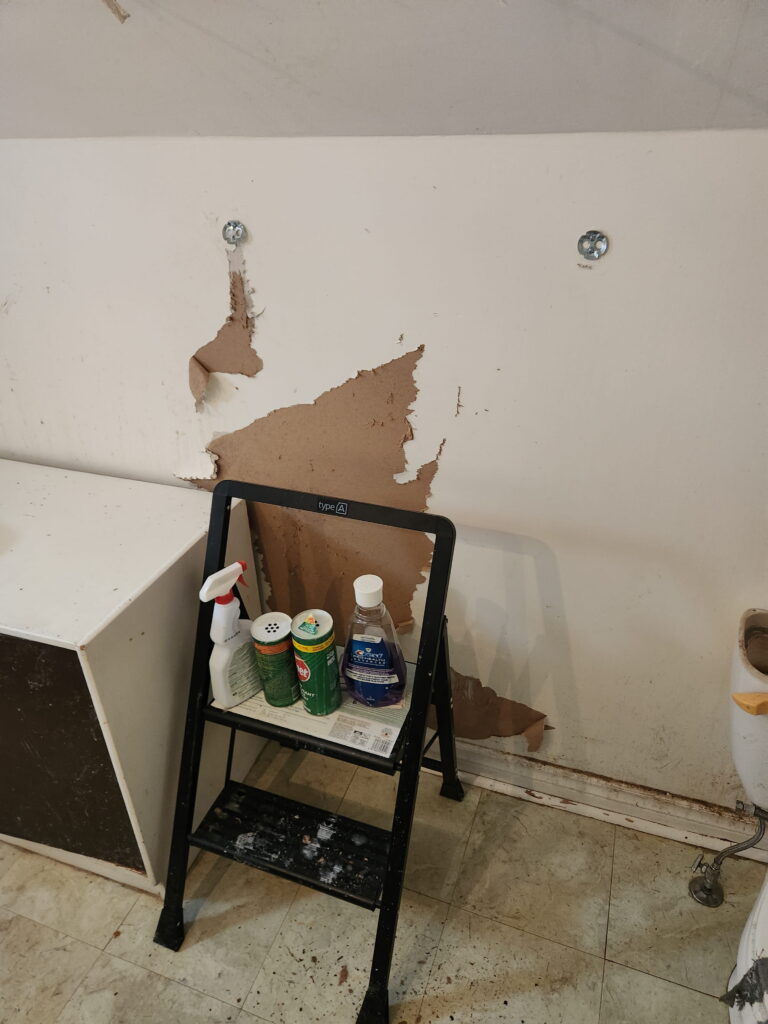
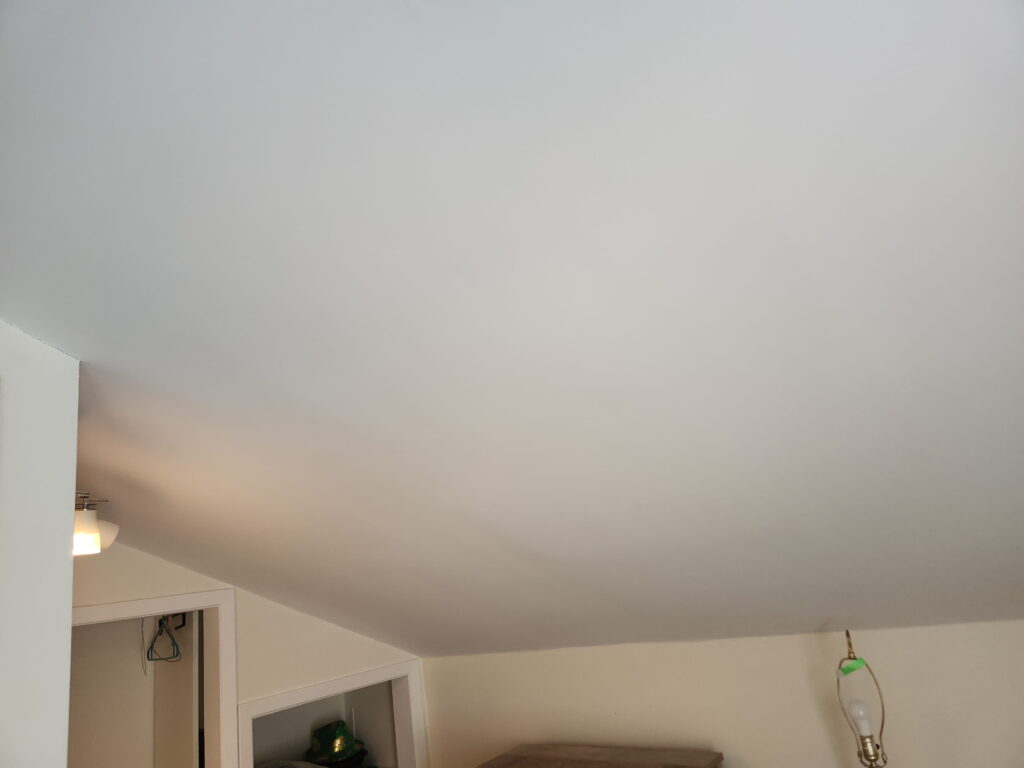
Bathroom Exhaust Fan Drywall Repair in Belleville: From Gaps to a Clean Finish
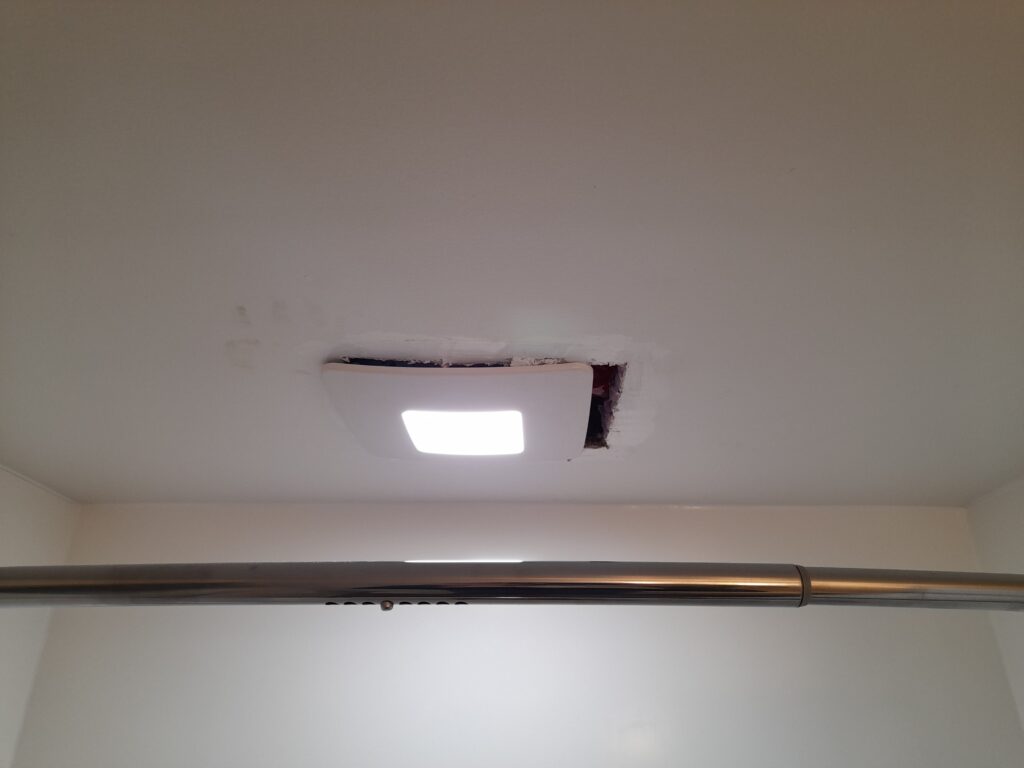
Bathroom exhaust fans are meant to remove moisture — but when they’re poorly installed or start coming loose, they often leave gaps, cracks, and unfinished drywall around the opening. For this bathroom exhaust fan drywall repair in Belleville, the fan itself was loose and improperly secured, leaving visible gaps around the ceiling opening. Before any drywall work could be done, the fan needed to be properly fixed in place. A clean drywall repair always starts with fixing the cause — not just covering the damage. The Problem: Loose Fan and Gaps in the Ceiling When we arrived, the bathroom exhaust fan: Was not properly secured Had visible gaps between the fan housing and the drywall Showed signs of a rushed or poor previous installation Trying to patch drywall around a loose fan would only lead to future cracking. The fan needed to be corrected first. Step 1: Securing the Bathroom Exhaust Fan Properly Before any drywall repair began, the fan was: Properly secured so it would no longer move Aligned correctly with the ceiling opening Checked to ensure it sat flush and stable Only once the fan was solid and secure could the drywall repair be done properly. Step 2: Drywall Repair Around the Fan With the fan fixed, we repaired the damaged drywall around the opening by: Filling gaps around the fan housing Taping the repaired areas to prevent future cracking Applying multiple coats of drywall compound Feathering the repair so it blended into the surrounding ceiling Bathroom ceilings are especially unforgiving, so extra care was taken to ensure smooth transitions. Step 3: Prime and Paint for a Seamless Finish Once the drywall repair was complete: The repaired area was primed to prevent flashing The ceiling was painted to match the existing finish After painting, the gaps were gone and the repair blended cleanly into the ceiling — no visible patch lines, shadows, or uneven edges. The Result: A Repair You Can’t See In the after photo, the ceiling looks clean and finished, and the exhaust fan sits properly in place. The drywall repair doesn’t draw attention — which is exactly how it should be. A proper bathroom drywall repair should look like the damage was never there. Bathroom Drywall Repair in Belleville Done Right Bathroom exhaust fan repairs often involve more than drywall alone. If the fan isn’t secured properly first, drywall patches won’t last. At Comfort Property, we take the time to fix the underlying issue before repairing the surface. Whether it’s a bathroom fan, ceiling damage, or general drywall repair, the goal is always the same: a clean, lasting result. If you’re searching for drywall repair near me in Belleville, or need drywall repaired around a bathroom exhaust fan, we can help. Recently completed bathroom renovation in Belleville…